Share/Bookmark

Get one in LAZADA now!

Wednesday, December 3, 2014

How to solve the issue of ALCATEL ONETOUCH SAPPHIRE 2?

How to solve the issue of ALCATEL ONETOUCH SAPPHIRE 2?

- Problem is do not have PHONE MEMORY icon displayed in File Manager
  even 1.73 GB of internal memory storage is available, it cannot access the
  camera because it needs memory to store the data, so it needs external memory..


What is the issue?
Does it needs Flashing?
Download new Firmware?
Or simply hardware problem?

-

The phone has a little bit shortage, it heats up upon charging....
  Hard reset or wiping data recovery is done already and is 100%
  done by pressing vol up+vol down+power.....


If you encounter same problem....
you can leave COMMENT HERE!

Tuesday, November 11, 2014

Hard Reset: MyPhone Agua Rio Fun solutions


Model Number: MyPhone Agua Rio Fun
Android Version: 4.2.2
Build Number: ALPS.JB3.M.V1.P146
Custom build version: S5200AP_Agua_Rio_Fun_20140527_v1.17


CLICK BELOW
* Press vol up and vol down + power button

* Select recovery mode: Volume up
   it must display My|Phone logo + android logo with red interrogative sign like this (!)

* Press power button

*Select wipe data/factory reset by vol up and down

* Press list key to choose not home key

*choose yes by vol down

* Press list to execute

* Wiping data done!!

* and reboot by list key...My|Phone logo should display!!
JOB well done....then smile....

______________________________________________________
++Intended for MyPhone Rio Fun V2, with software version S5202Ap_KK_Agua_Rio_Fun_20140910_1.09++


Update: Although this firmware is intended for MyPhone Rio Fun V2, with software version S5202Ap_KK_Agua_Rio_Fun_20140910_1.09 (as shown in my photo that I took below) there's still a possibility that you might brick your phone. As I have said below, I only tried this firmware once with Privacy Password Lock problem. And the procedure that I use is below, and it worked for me. I am not really sure what happened to other MyPhone Rio Fun users that flashed this firmware.


!!!So please flash at your own risk.!!!


Update 2:  I was able to fixed another phone with this firmware. The problem of the phone was I was expanding the storage via Link2SD and I accidentally erased an important file. So what I did is I restored the back up via TWRP, but I cannot restore because of mismatch md5 checksum. So tweaked the back up files. And restore again. And BOOM! I bricked the phone. So my last resort was to flash this firmware. I also experience the 4% of death. I tried to firmware upgrade first and It successfully flashed but the phone is in boot loop state.So I flashed it again (Download Only) and it finally boot up properly...

This firmware is for MyPhone Agua Rio Fun V2 or board Version 2 for MTK6571. I have tried this firmware in a phone with Privacy Password.

Please follow my guide carefully, because you might brick your phone. You might experience the 4% of death when you are trying to flash your phone.

The firmware is not rooted. If you want to root this phone you can use Kingroot. 

The software version of this firmware is version 1.09. Please check your software version in factory mode (PRESS AND HOLD VOLUME UP + DOWN + POWER BUTTON) Then go to test item, then select the first item.


You can fix the following issue in your phone:
1. Bootloop
2. Damaged System UI
3. TP Upgrade only
4. Dead phone but it is detected in computer
5. Remove Gmail Account / Password / Pattern Lock (Alternative Way)
6. Privacy Protection Password Lock up

"DOWNLOAD THESE FILES" 
-------------------------------
-------------------------------Firmware Here -->MyPhone Agua Rio Fun Kitkat MTK6571

VCOM Driver -->VCOM Manual
Alternative Driver --> AutoInstaller
SPFlashTool --> LatestVersion 


"Use WinRar or 7zip to extract the firmware" 
"Extract the files to your desired folder" 
"If you encounter error in flashtool, use different version of it."


 "I suggest to use 32bit Windows OS for compatibility of the driver"


Installing Driver with AutoInstaller

First try the Alternative Driver, which is the AutoInstaller. Just open the install.exe then it will automatically install the driver. To fully check if the driver is correctly installed in your computer. 

Follow these steps:

  1. Turn off your phone (always powered off is a must)
  2. Press and hold volume up or down, or you can simple press the two button.
  3. Insert your USB cable without releasing the VOLUME button(s).
  4. In your computer, it must detect your phone and it will install the MTK Preloader or Mediatek USB VCOM driver.
  5. Repeat 1 to 4 if it does not detect your phone.
  6. If MTK Preloader/Mediatek USB VCOM Driver is installed you are good to go in flashing your phone ^_^

Reference Video using Driver Auto Installer (watch in HD)


Installing Manually using VCOM Driver
When installing it manually your phone must be turned off, then connect it to your computer/laptop while pressing VOLUME UP or VOLUME DOWN. This will detect and look for the driver.


 1. This is the first time that you will connect your phone and it will search for the correct driver.

2. Check include this location ... ... and click on browse. Look for USB VCOM Driver and Click on 2K_XP_COM folder if you are using Windows XP or Win7 for Windows 7 and then press OK when you are done picking the right folder for the driver.


3. If the driver is successfully installed MediaTek DA USB VCOM will appear in the New Hardware Wizard.

Video Installing VCOM Driver (please watch in HD)


"Your Phone must be turned off when you are ready to connect and flash your phone" 

Flashing
1. Launch FlashTool (flash_tool.exe)
2. In Flashtool, Click on Scatter-Loading, and load your scatter file. (see example below)

Reference Video Using FlashTool version 5.xxx (watch in HD)


 3. After you load the file, UNCHECK PRELOADER only, press Press Download to Flash your Phone.

4. After you press Download Follow these steps
  • Turn off your phone (always powered off is a must)
  • Press and HOLD volume UP or Down or you can simply press it simultaneously
  • Insert your USB cable without releasing the VOLUME button(s).
  • Keep on repeating until Flashtool detected your phone.
5. If successfully detected just wait until the progress bar reaches 100%. If your phone did not automatically turn on after flashing, remove battery and USB cable. And put back your battery then turn on your device.


"Hard reset your phone after flashing"


Some workarounds:
If you encounter PMT_Changed error here is what you do:
In Latest version of Flashtool

PMT_CHANGED error occur when firmware is not compatible with your phone. Sometimes your phone has a different board version. You should check it too, if your firmware is compatible with your phone.  

If you encounter Privacy Protection Password:

  1. Open flash_tool.exe
  2. Load the scatter file
  3. Goto Format Tab
  4. Click on Format except bootloader
  5. Press Play/Start Icon
  6. Then remove battery
  7. Insert the battery again
  8. Insert the USB cable (you should hear a beep on your computer, and it should proceed in formatting.)
  9. After done formatting proceed in Flashing.
  10. Goto Download tab (I assume that you loaded the scatter file already)
  11. Uncheck PRELOADER (this is very important)
  12. Press Download
  13. Then remove battery
  14. Insert Battery again
  15. Insert the USB cable (you should hear a beep on your computer, and it should proceed in flashing or downloading the firmware in your phone.)
  16. Power ON the phone after flashing.
  17. Restore your IMEI.


For Invalid IMEI:Your Phone/Tablet must be rooted first
Restore yong IMEI in MTKDroidTools version 2.5.3. You will have this error when you format your phone in Flashtool as I had experienced. To restore download MTKDroidTools version 2.5.3 After you extract the file. Open the green robot, you must enable the usb debugging in your phone. It is usually located in Settings>Devoloper Mode then look for usb debugging. After enabling it. Connect your phone in your computer then in MTKDroidTool click on ROOT. Wait for it to finish, then Click in IMEI/NVRAM, input 15 number in each box. Then click REPLACE. Then click Reboot or you can manually turn off your phone. Then turn your phone on again. You can see that you have fully restored your IMEI. 


FOR DAMAGED BASEBAND or UNKNOWN BASEBAND (Your phone must be rooted first)

1. Make sure you have MTKDROIDSTOOL version 2.4.8 or version 2.5.3 (you can search it in google)

2.  In MTKDroidstool (I assume you launch the tool) -- Click in Root. 
3. In your device -- After you press Root, you need to authorize it. A pop up message will appear. Click Allow/Authorize depends on your root application.
4. In MTKDroidsTool -- Click in IMEI/NVRAM, then click in RESTORE.
5. Then look for the folder where you extracted the NVRAM files.
6. Check if the Baseband is fixed. And if the IMEI is fully restored.
7. If Baseband is still Unknown and IMEI is invalid. Then you need to hard reset first your phone.
8. After hard reset your baseband should be fixed already. (base on my experience)
9. If your baseband is fixed sometimes the IMEI is still invalid. So you need to restore the IMEI.
10.  To restore IMEI follow Step 1-4, but you should not restore. You should fill the IMEI then click REPLACE. Then reboot your phone.  VOILA! I hope the phone is fully working :)

I hope this tutorial help you. Please drop a comment if something is not clear to you.

Tested by:
Me - Files / Flashing / Privacy Protection Password

I would like to give credits to those who uploaded the file online.

Friday, September 26, 2014

Galaxy device SECRET CODES


Open your phone’s dialer and type the following code: *#197328640#*. In case it does not work for you, try this one: *#*#197328640#*#* . This will open the Service Mode menu on your Galaxy device. Select the option N. 2, that is “Version Info”. On the next screen, select ‘HW Version” (here HW means hardware). Now you will see another set of options on the next screen. Now tap on “Read CAL Date”, and bingo! You can now see the date of manufacture of your phone.

*#0**# LCD Screen test
*#06# Show IMEI Number
*#2222# HW Version
*#1234# Phone info/Firmware version
*#34971539# Camera Firmware settings
*#9900# Sysdump (Logfiles etc.)
*#0228# Battery diagnostics
*#7353# Function testing
*#9090# Service Mode
*#197328640# Service Mode Menu
*2767*3855# Factory Reset (not tested)
*#32489# -- (Ciphering Info)
*#4238378# GCF Configuration
??*#872564# USB Logging Control
??*#3214789650# LBS Test Mode
*#34971539# Camera Firmware Update
*#7412365# Camera Firmware Menu
*#301279# -- HSDPA/HSUPA Control Menu
73876766 SELLOUT SMS ENABBLE
738767633 SELLOUT SMS DISABLE
7387678378 SELLOUT SELF SET TEST MODE
7387677763 SELLOUT SMS SET PRODUCT MODE
4238378 GCF SETTINGS
4387264636 SELLOUT SMS MAIN
*#528# -- ?? Wireless Lan Tests
*#7465625# -- unlock? errors?
*#197328640# – Enabling test mode for service activity
**05***# – Execute from Emergency dial screen to unlock PUK code
??*#07# Test History
*#1234# View SW Version PDA, CSC, MODEM
*#03# -- NAND Flash S/N
*#80# -- Touchscreen noise test (warning do not press power button)
*#251# -- Wakelock ON
*#250# -- Wakelock OFF
*#350# -- Reboot
*#526# -- WLAN Engineering Mode
*#528# -- WLAN Engineering Mode
*#745# -- RIL Dump Menu
*#746# -- Debug Dump Menu
*#0011# -- ServiceMode [1]
*#0228# -- Battery status
*#0283# -- Audio packet loopback test
*#0289# -- Audio/speaker test (Melody Test Mode)
*#0514# -- SysDump (System Dumps, logs, etc)
*#0588# -- Proximity Sensor test
*#0589# -- Light Sensor Test Mode
*#0673# -- Audio/speaker test (same as 0289)
*#0782# -- Real Time Clock Test
*#0842# -- Vibration Test
*#1575# -- GPS Control Menu
*#2263# -- RF Band Selection
*#2663# -- Touchscreen FW and version
*#2664# -- HW touchscreen test
*#3264# -- RAM CHECK (Version number)
*#4327# -- HDCP INFO (True/ false)
*#7769# -- PROXIMITY SENSOR TEST
*#7284# -- Phone Utility (USB Settings)
*#7353# -- Self Test (Menu of 12 tests to use)
*#7594# -- Factory mode Enable shutdown on long press
*#8888# -- Service Mode (Read FTA hw version)
*#9900# -- System Dump Mode
*#9999# -- SW Versions (AP, CP, CSC, FTA SW)
*#22235# -- ACCELEROMETER SENSOR INFO
*#86824# -- TOUCH KEY SENSITIVITY
*#5238973# -- LCD TYPE
*#232331# -- BT test
*#232337# -- BT address
*#232338# -- WLAN MAC address & PS mode
*#232339# -- WLAN Engineering Mode test (TX & RX modes) (same 526)
*#272886# -- Auto Answer Selection
*#3214789# -- GCF Mode Status
*#8736364# -- OTA Update Menu
*#7412365# -- Camera Firmware Standard (Front/Rear Cam FW)
*#7465625# -- Personalization (Lock Status settings)
*#22558463# -- Reset Total Call Time
*#12580*369# -- Main Version (AP, CP, CSC, RF cal, HW Rev) (similar to 9999)
*#197328640# Service Mode
*#3282*727336*# -- System and Storage Information (Data Usage Status)
*#273283*255*3282*# -- Adjust/Fill Message, Contact, Call Log, etc Limits
*#273283*255*663282*# -- Data Create SD Card
*#7328735824# -- LOT ID

Galaxy S3 with Service Menu open- Secret Codes for Android


==================================================================================
Here is a Galaxy S3 with Service Menu open-
Secret Codes for Android
*#06# – IMEI number

*#0*# – Service menu on newer phones

*#*#232339#*#* – Wireless LAN tests

*#*#0842#*#* – Backlight/vibration test

*#*#2664#*#* – Test the touchscreen

*#7465625# – View phone lock status

*#9900# – System dump mode

*#9090# – Diagnostic configuration

*#872564# – USB logging control

*#*#34971539#*#* – Detailed camera information

*#*#197328640#*#* – Enable test mode for service

*#12580*369# – Software and hardware info

*#301279# – HSDPA/HSUPA Control Menu

##7764726 – Hidden service menu (Motorola Droid)

*#*#7780#*#* – Reset the /data partition to factory state

*#*#4636#*#* – Phone information, usage statistics and battery

*#*#273282*255*663282*#*#* – Immediate backup of all media files

*2767*3855# – Format device to factory state (will format everything on phone)

*#*#1111#*#* – FTA software version (1234 in the same code will give PDA and firmware version)

We would like to advise you to use these codes carefully. Some of these codes might create problems for you, so do not use them unless you are sure what you are doing.
========================================================================================================================

Samsung Galaxy Y young


========================================================================

How To Unlock Android Phone After Too Many Wrong Pattern Attempts?

Unlock android phone after too many wrong pattern attempts:


Note - this method involves wiping off all data on your phone,including installed apps and the setting you have done.

1. Turn the phone off the phone

2. Long press the upper volume key, menu key and the power key simultaneously

3. Relieve for a fraction as soon as you see the screen display in"Samsung Galaxy Y young" again press the 3 keys simultaneously

4. Now you will see a screen displaying "Android system Recovery"

5. select the 3rd option("Wipe data/factory reset") using the volume keys and press the centre menu key

6. select the "Yes" option again using the same keys.

7. after some time, it will say, the reset is done

8. just select the reboot option and your phone is UNLOCKED.

Though it will wipe all your data,i find it relevant as it saves some Money

It's done...!!!


==================================================================================

My Pad tablet My Phone.


My Pad tablet na My Phone.


"Too many pattern attemps" ang problem nito.
di ko na nakuhanan ng picture eh.


Hindi kc ma-iturn-off

Ito Ginawa:

press ko muna ang "reset button" dyan sa gilid.


then mabilis na press ang VOL UP + POWER with-in 3seconds bitaw lahat then
press VOL_UP
then nag automatic hard reset na ito, wait lng ako mag complete.
yun success mga boss, na tyambahan din.

the same principle lng pala.

Tuesday, September 23, 2014

DISCLAIMER

Terms And Conditions Of  Use 


 All content provided on this "android-fixers.blogspot.com" blog is for informational purposes only. 

The owner of this blog makes no representations as to the accuracy or completeness of any information on this site or found by following any link on this site. 

 The owner of android-fixers.blogspot.com will not be liable for any errors or omissions in this information nor for the availability of this information. The owner will not be liable for any losses, injuries, or damages from the display or use of this information.

Wednesday, September 10, 2014

Top 5 Android tip and tricks


Android is the most popular mobile OS with 3 billion active users so here are our top tips and tricks so you can get the most out of your Android smartphone or tablet. See also: 34 best Android smartphones in UK: What's the best Android phone you can buy in 2014? There are all kinds of things which Android can do and you might not even know it, so that's why we've put together our top tips and tricks. We'll be adding to it so get it bookmarked and come back soon. We've kept the tips pretty broad but please bear in mind that the look, layout and features will vary between devices. Older phones and tablets may not have the latest version or your manufacturer may use its own user interface, for example. Android L vs Android 4.4 KitKat comparison review: What's the difference?

 Top 5 Android tip and tricks

Folders
One of the most basic things you can do in Android to make your life easier is to group your app icons into folders. You can have them littering the homescreen panels but let's face it, it looks horrible and if you want it like that you're pretty much mirroring the iPhone.
To group your apps into folders simply long press on one and drop it on top of another. This will make a folder which you can name and on some device select a colour for. Drag and drop other icons to add them to the folder. This way you'll have more space for widgets and you'll see your wallpaper better
Android tips and tricks: Google Now

Google Now
With the introduction of Android 4.1 Jelly Bean came Google Now and if you haven't used it yet then you really need to check it out. It's effectively an intelligent digital assistant which is part of the Google Search app and a quick way of seeing if you have it is to swipe up from the bottom of the screen. You may have it but not yet opted in for the service.
The idea is to provide the information you need before you've even searched for or requested it. The cards based interface (as well as notifications) provided all kinds of helpful information such as the weather, sports scores, travel information and much more.
Android tips and tricks: Gesture typing

Swipe gesture typing
This one will depend on your device and Android version but even if you don't have it you can download the Google Keyboard for free from the Play store or a third-party alternative (SwiftKey is now free).
Swipe gesture typing might not be for everyone but it's definitely worth trying out as it can be much faster and easier than pressing buttons. It works by simply swiping around the keyboard to each letter you need to make a word in order without losing contact with the screen. Based on the shape you make, the keyboard can work out what word you want – even if you don't do it very accurately.
It doesn't always work but keep forcing yourself to use it and you will, along with the keyboard itself, will get better over time. You can also swipe from the shift or symbols keys for quick caps and punctuation.
Android tips and tricks: Data usage

Manage data usage
Unless you pay enough for unlimited data, you're phone contract will have some kind of limit. Whether it's 500MB or 8GB, Android has a great way to track and manage your mobile data usage.
Simply head to setting and click on 'Data Usage' where you can see a helpful graph of your usage over a period of time. The idea is to match the dates with you contract. You can set a warning level and a cap so you don't go over your limit. You can also see which apps use the most data, too.  
Android tips and tricks: Sreen lock security

Set security
You might be happy to simply unlock your Android device with a swipe or perhaps not even that, but it's a good idea to use a higher level of security – especially if it's a device which goes out and about with you.
In Android there are various different security options (the Galaxy S5 even has a fingerprint scanner), so head to security section of the settings menu to choose which you want to use under 'screen lock'. You can opt for swipe, face unlock, pattern, PIN or password.

Common Tablet issues


Common Android Tablets issues :

Firmware , ROM file will be used when your Android tablet facing various problems .

 1. Forgotten Pattern Lock on Android Tablets.

 2.Too many pattern attempts / Reset user lock.

3. Tablets PC stuck on Gmail account. 4. Android Tablet PC stuck on Android logo.

5. Tablet Android hang on start-up / Multiple errors generating by OS.

 6. Google play store having problems or generating errors.

 7.Upgrading to new Android OS. you can use this Android Tablet firmware, ROM to restore your Android China tablets to generic firmwares or upgrades .

 Make sure to charge battery upto 60%. Power failure during flashing may result dead or broken tablets.

Note : Flashing generic tablet firmware should be last option.

tips in daily use of my tablet


My daily use habits are: Morning

1. Unplug my Tablet from power adapter

2. Turn it on from Hibernation, wait for about 10-15 seconds for it to redo Micro-SD card, Turn on Wireless wait for DHCP to allocate my unit with an IP address.

3. Check my GMail. I access my Gmail only from my Tablet. Google the news

4. Hibernate. 10-20 Minutes total for Steps 1-3 Lunchtime (At Work Either Work Guest WLAN (Don't Tell ;-) or eatery with Wireless ) Redo Steps 1-3 with the additional step of accepting the user agreement for the WLANs

4. Read an E-Book or watch You-Tube or Video I have Ripped (Turn off WLAN if watching local video or reading)

 5. Hibernate, 35-50 minutes total. Down to about 65% if I watch video or use WLAN Evening (Home again) Redo Steps 1-3 above 4. Reply to emails or forward to other account

5. Read some more, Hibernate, Plug-In to power and go to bed

6. Total time about 30-45 minutes Down to about 20% Total Maximum use in a day thus far about 3:40 before Plug in warning comes on of constant use. That was using my most agressive power saving efforts. If I am careless, I get the warning at about 2:30-3 hours of use. My personal opinion is I could get better/longer life if I had had the ability to get a larger capacity battery. The specs say 2100, but am unsure until I open it. I personally think I have only an 1800-1900 battery. In regards to Item #5: I play,I hack I try to get inside my device to understand. I am currently trying to master and use my Linux knowledge with ADB. The reason I mention what an apk file is only a zip file is the same reason, making people aware CBZ and CBR are nothing but JPG images stored in a renamed zip or RAR file. CBZ=Comic Book ZIP, CBR=Comic Book RAR. The usefulness of knowing what is in the apk is that if you have the ability to read and inspect XML, and the contents inside, you can discover things you did not know like switches or extended features. Creation of a another pane is easier for me to do than describe, One way involves filling your screen with too many icons and then it will automatically create another pane, BUT a word of warning, Getting rid of the extra pane is harder than creating one. I have a spare pane that I am still trying to figure out how to remove. I will describe both creation and removal once I figure out how.

Useful for your tablet


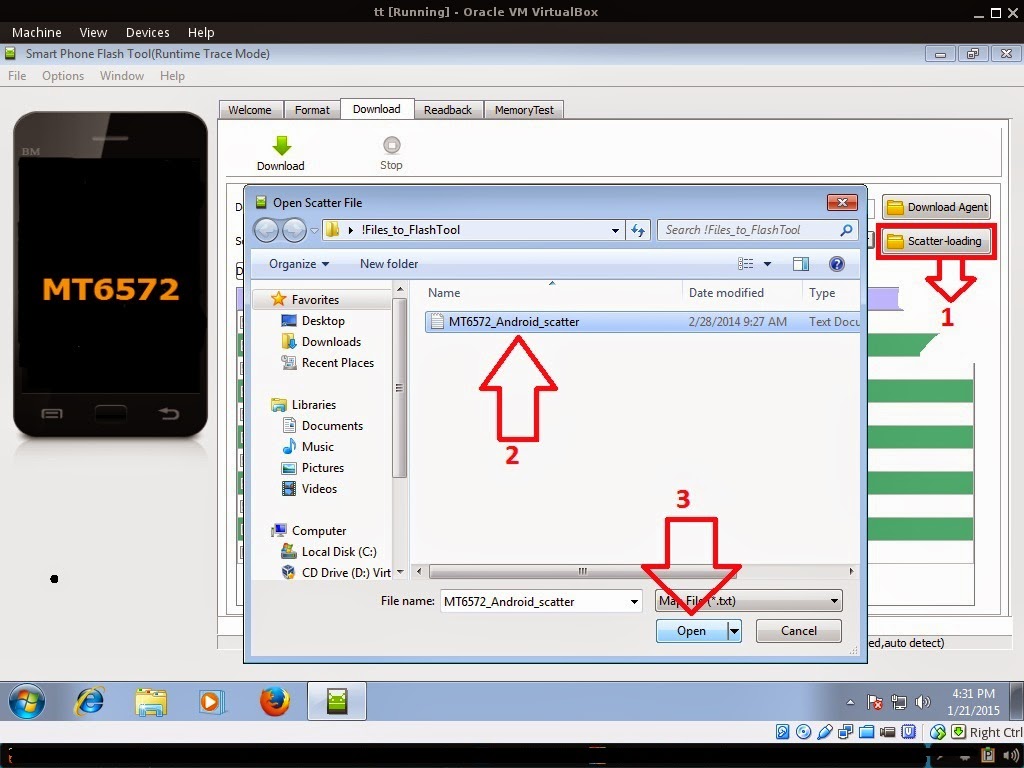
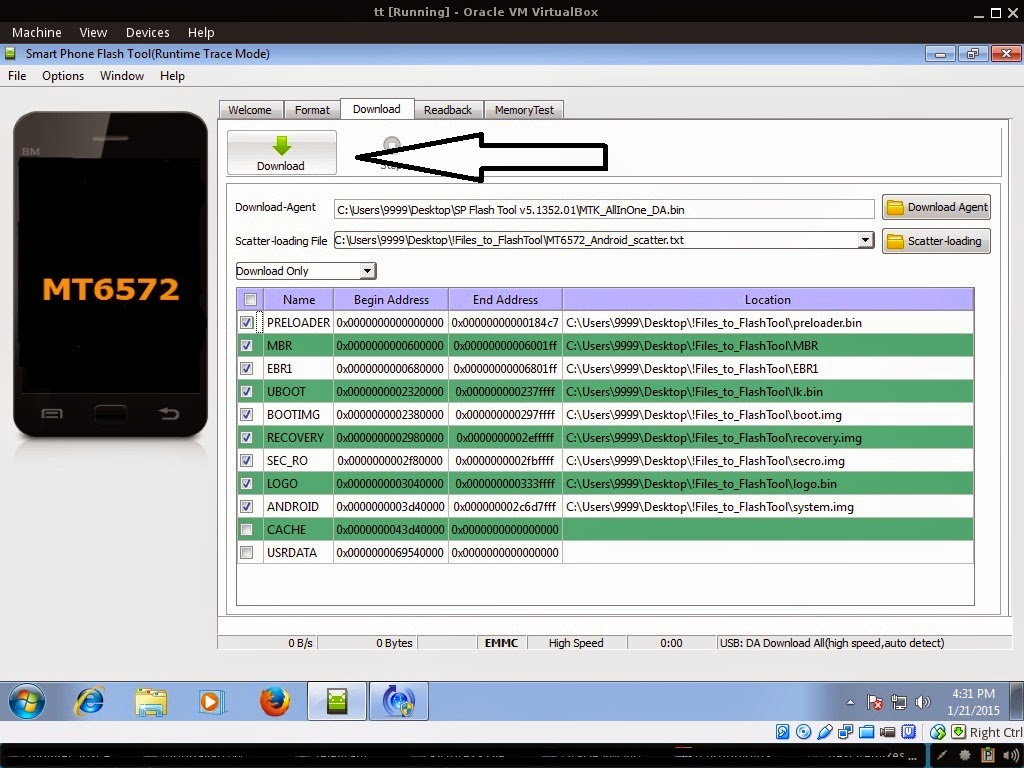
This is just to help you get the most out of your Android Tablet.
If you are like me, you have one of the low cost versions. They are all generally alike. Some have older versions of Android. Mine is one of the basic 1.6 with 1.7.4 Firmware. I ran a system info inspector and such. Every response comes back with Generic. It is a duplicate of some version our there, but it meets my needs. Many of these things may be obvious. Other items less so.
1. Turn off what you do not need. This does cripple some function. But does wonders to battery life Screen Brightness, Wireless, 3G and Sound all use CPU cycles and will draw on the battery if you have it enabled.
2. Keep a Task killer. This is essential to me. There is some disagreement about this(See Link). I disagree with this Narrative. I use Linux and while some of his points relevant do not seem to hold true for me thus far with my Tablet. My experience has been; the more apps running, the more memory used and will impact CPU utilization which will slow your machine and eat into your Battery life. This is the Task killer I use. Simple and to the point. I run it once a day. Just because you close the app, does not mean you have stopped it running. Please Note I am not saying remove all tasks. Just the Applications you are not using such as the MP3 player or the RDP remote control app.
3. Hibernate over power off to extend battery life. The time it takes to reboot is battery life that you could have used listening to MP3s, watching Video, Browsing the Internet, etc. It also is really boring after a while looking at the little Green Droid.
4. Adjust the screen brightness to be just bright enough. This will extend your battery life. Notice a pattern. I do everything I can to get the most out of my battery while maintaining performance. The default is full bright. My Tablet can be adjusted to dim multiple levels. I adjust according to my lighting
5. .apk files are just zip files. (Geek interest only) This is helpful to inspect the contents.
6. Pull Down from the Top. Hold down on the top task bar, a pull down tab will appear. Just drag it to the bottom. This will show you notifications and open running apps.
7. Icon Delete is just a hold down. Have an Icon on the pane you do not use. Hold down on the icon. Then drag it over to the wastebasket that has appeared. If you hold down on a file in the File browswer, You can cut, paste, rename, etc. To paste a cut or copied item,just hold down in an empty area on the pane and the selection screen will appear.
8. Multi-panes are useful to reduce clutter. The tablets touch screens are somewhat rough in the precision. For scrolling, I find creating multiple panes and leave the bottom third for flipping from one pane to another. I then sort the apps according to the pane.
9. Calibrate using a Stylus: The more precise you can calibrate the easier it is to use the touch and scroll. I have found calibrating using a stylus helps in getting a more precise touch calibration
10.Do not let your battery completely drain. Lithium Batteries do not have memory like old batteries, but full drain and recharge shortens the battery life. These units are not really designed for battery replacement. You can get the battery if you know where to order. But You better have the Electronics repair skills to change it. It is not hard if you know how to solder and know how to bend plastic without break or cracking.
I hope even one of these tips are helpful

Catch some quality Z’s this weekend with your #AndroidWear. The Sleep as Android app helps you fall asleep, stay asleep and wake up at the optimal time #WeekendWear https://goo.gl/PVkP7

Posted by Android on Saturday, May 30, 2015

pc cp technician forums